fb icon

fb icon
Follow E-tek on fb!

January 29, 2012

Torque box V - Right side

The Right side looked better than the left. If I where a lazy man, I'd say it was hardly worth doing....


Until I poked a screw driver through it....


Once I saw how bad it really was, I new I had to start cutting. As you can see, I remove the gaurds from all my grinders in order to be able to use much more of the tool. It can be rather dangerous if you don't pay attention and even so, I've gotten a few cuts and burns right through gloves while cutting metal.


Check out all the dirt, mud and rusted metal that was residing in the box and frame rail - unreal! This is what causes rust to form so heavily - a place for moisture to remain, along with chemicals that are put on the roadways in winter: salt and potash mostly. I wish I had done these when I got the car 8 years ago!

Once the worst rust was cut out - back to strong, cleaner metal - I removed all the loose dirt, scale and rust by scraping and vacuuming, using the long hose attached to the vacuum to reach into the frame rail and rocker panel. Once cleaned, I'll put several coats of Rust Bullet's single stage Epoxy on the areas I can reach, plus Eastwood's Internal Frame Coating with it's long tube applicator, on areas I cannot reach.


Don't forget to check out the website at www.E-tekRestorations.com ! Special thanks to www.Eastwood.com and www.CarCraft.com !

January 28, 2012

240Z's ROCK!

It's hard NOT to be a fan of the 240Z - especially when you see someone kick ASS in one. This one gets away from 350Z's, spec cars and then laps back marker at 7:35.

240Z Kicks it at Summit Raceway

Here's another one....


Ours is still a ways away, but one day.....


Don't forget to check out the website at www.E-tekRestorations.com ! Special thanks to www.Eastwood.com and www.CarCraft.com !

January 26, 2012

Just back from Las Vegas Raceway where I took some laps in a Ferrari F430.


They had several other rides to choose from too:


Of course a Ferrari is a Ferrari!

After a couple 'discovery laps' where the head instructor whips you around the track in a Porsche Cayenne, you get in your chosen ride and get to beat on it for 5 laps. While most of the other drivers where taking the first couple laps easy, I was gettin' my money's worth and I can tell you now, that no mater how many times you read about big 6 caliper brakes and 500+HP, you don't realize just how good it feels until you get to beat on one on the track! I will say however that the track was a lot shorter than I would have liked....

Don't forget to check out the website at www.E-tekRestorations.com ! Special thanks to www.Eastwood.com and www.CarCraft.com !

January 21, 2012

Tokens

The owners of the 1956 Chevrolet 3100 Truck gave me this Die Cast Replica as a token of their appreciation for doing the restoration. Ironically, I appreciate THEIR gesture and for being such a great family to do a restoration for!


Although it's a '55 model, it's incredibly close in color and overall look! It'll look great with my other collectibles, which I keep on a shelf along the ceiling in the shop.


Being in a hockey town I even have Joe Thornton MVP stick, that Mrs E. got when she worked for Kelloggs.... It's one of the few non-automotive items in the shop.


I bought this Datsun 240Z die-cast when I decided I would rebuild our Datsun for my son Colton. It's a great motivator of just how nice these cars where - and can be. I'm not sure why they would make a 1972 version of all the years to choose from though - our car (the real one) is an early '71, which is much more desirable.


Just a little ways to go before the real one looks the same! Why haven't I removed the glass yet?


Lastly, my collections also include some cool vintage HotRod Magazines and "personalized plates" for my other cars.

Vintage magazines, Mrs E-tek's race-suit, plate for the 46 Merc.


Don't forget to check out the website at       www.E-tekRestorations.com !
Special thanks to www.Eastwood.com and www.CarCraft.com !

January 20, 2012

Rebuilding the Torque-boxes - IV


The bottom plate will complete the structure on this side and is ready to be welded in. I ground the edges again, taking away an Kitty-hair that got close to the welding area. The inner part of the plate was sprayed with several coats of Rust-Bullet, a new to the market, single part, moisture-cured resin in the same category as POR15, but with the added benefit of having full UV protection.


I held the plate to the torque box with several items, including this bottle jack and a couple of sections of pipe. Beginning with several tack welds, I then turned up the voltage slightly and ran 1" long beads, alternating from side to side,  until it was welded in solid.

I dressed the initial welds then went back and filled in any gaps. The plate was solid and the box was now complete, except for some finishing work.

After a thorough cleaning with Pre-paint solvent, I coated the welded areas with a thin coat of  kitty-hair. This stuff dries so hard that - if needed - would add another layer of structural integrity. It certainly wasn't required here, as this 12gauge plate is the heaviest material I've ever done repairs with - but it is important, mostly to seal up the repair and secondarily to smooth it all out.

January 19, 2012

Galaxie Torque-box repairs - III

All the side pieces where welded in today, confiring a lot more strength to the torque-box structures.

First up is fitting the pieces. Grinding edges, bending into shape and trimming holes for any  pass-throughs.

After that, I marked the edges on the torque-box side and used a carbide bit and grinder to clean off the metal where the weld would hit.


Something I like to use when welding near anything that may get heat damaged is Benzomatic's COLD COAT. It's a gel that blocks heat and dampens it's damaging effects. Also, it confers an additional level of safet when things get hot!
Here I've coated a fuel-return line with the Cold Coat. It was far enough away so as not to be in direct contact with the weld, but better safe than sorry!
Before welding in the patches I measured the distances from the frame to the lift ramp on each side to be sure there was no twist in the frame. This left side was about 1/4" lower than the right side, likely due to the effect of driver weight over time. Regardless, I used a bottle jack to equalize both sides prior to welding so that when everything was welded solid there wouldn't be a discrepancy in frame height.


Front and rear pieces welded in.
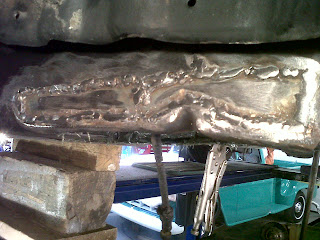
Welds dressed with carbide bit and 40 grit disc on the 4 inch grinder.

In order to seal any gaps - and add even more structural integrity - I always cover my patches with "kitty hair", a fiberglass re-enforced filler. Although this area will be forever hidden once the bottom plate is welded on, one can forsee moisture from puddles getting in there, so it's critical not to leave any spaces or surfaces where water could penetrate and sit. Oncethe filler is dry I'll smooth it out and apply a black undercoating - prior to welding up the bottom plate.

The outer surfaces where also coated with Kitty hair. It dries to a solid, again, it's a structurally sound surface that can be smoothed out with a grinder or sander, whcih will be important here as all the outer surfaces will get dressed out until the repair is invisible.

Tomorrow, the last piece to go on will be the bottom plate. This will enclose the torque-box and add much needed strength where the frame meets the front substructure.                                           Almost done this side!


Don't forget to check out the website at www.E-tekRestorations.com ! 

Crozon Family visits E-tek for the BIG REVEAL!!

Today was a big day at the E-tek Restoration Shop, as one of the original owners of the freshly restored 1956 Chevrolet 3100 came to see the finished product.
After a good look at all the details, we fired it up and Mr. Crozon sat in the truck that he and his brother purchased, 55 years ago! I hope it brought back many pleasant memories!


LEFT: The owner and his son, Warren, who helped his brother-in-law Trent tear the truck down when they couldn't find a "retail" shop to perform the work.


BELOW: The Crozon family. During their visit they told me several stories of how relatives would come out to the farm as children and drive the truck around the farm. Sounds like quite a few people learned to drive in this sweetheart of a ride!


Over the next few weeks Warren will be trailering the truck to an undisclosed storage spot to await the spring thaw. At that time it'll be back for a final road test and to install a few parts that are still on order.
As a token of appreciation, they gave me a die-cast replica of the truck - same color and all! It'll look great in my collection and be a nice reminder of the restoration. Thanks Warren!

January 18, 2012

240Z metalwork: floors

 Between the Galaxie, the 240Z and a soon to arrive '67 Cougar, there's going to be a lot of metal-work going on in the E-tek Shop for the next while!

This weekend I got my son Colt to help me clean up around the 1971 Datsun 240Z so I could begin the task of cutting out and replacing the floors. First think I did was make some braces in order to shore up the trans-tunnel sheet metal. I bolted these to the transmission crossmember mounts and the the rear-end mount. This should help keep the bottom end from moving when I start cutting - but even with this hep, I'll work on only one side at a time.


This is a first cut I did some time ago - before deciding to build a rotisserie. The patches (below) run from the toe board to behind the front seats.


The rotisserie not only gives me full access to the underside, but allows me to work standing (or seated) with the work in front of me. I built this unit in a weekend for about $200 in metal, hardware  and wheels.


Don't forget to check out the website at www.E-tekRestorations.com !

Galaxie Torque-box pieces

Although I only got a couple hours in Zanadu today, it was anough time to cut out the pieces I need to repair the Galaxie torque-boxes. Tomorrow they get welded in:


My son Colt helped in the measuring:


Don't forget to check out the website at www.E-tekRestorations.com !