Holy Cr^P. Ever have one of those super-frustrating days where a seeminly simple task takes HOURS longer than it should and you can't find what you need, try it 5 different ways and even cut your head open....and then the WIFE comes in and figures it out in 5 seconds....No? Oh. Well never mind then.
Today I installed the window runner felt kit, the vent window and runner and the door glass assembly's into the drivers door. After what was a 6+ hour ordeal, the riight door likely won't take more than an hour!
First off, install the window side felts, AKA Cat Wiskers, which snap in on either side of the window opening slot. You may have to use a screwdriver to squeeze one end of the clip to get it started in the hole, then push really hard to snap it in. You can't do these later, as the window will be in the way (same on most cars).
Next, I attached a pair of Vice Grips onto the regulator spline in order to be able to move the regulator arms when installing the door glass:
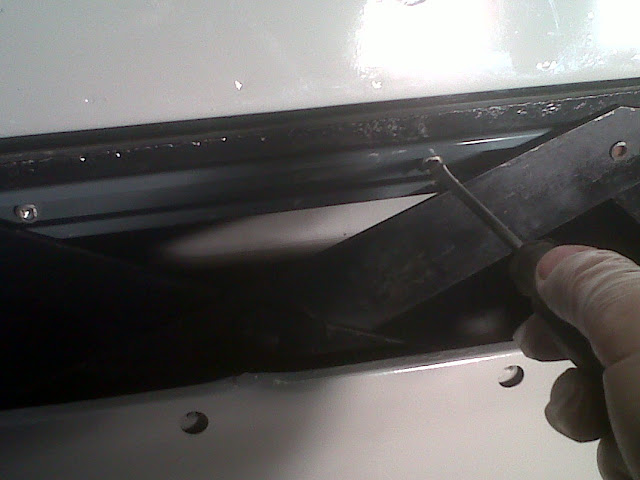
Next comes the large window runner felt on the door side. This item is slid down into the door and seated in a clip near the bottom of the runner, then carefully measure to where the vent window frame meets it and then cut to length with tin snips:
Poor photo, but this is looking down into the door. The new felt is slid into the clip at the bottom of the runner:
Now with most cars - and all others I've done - you slide the window down into the door and either tip it sideways to engage the rollers, or attach felted bolts through the window into the regulator arms......not so with the General. Not so at all.
After 2 or 3 hours of trying the above, scratching the shit out of the freshly painted window frame in the process, I took a break to re-paint the frame. While waiting for it to dry, I decided to try the other door, this time with the vent glass in. No go. Then I decided to remove the runner from the window and attach it first, then send the glass down and attach it. While that worked to get the channel on reg arm wheels, I still couldn't get the glass in with the vent runner attached in. Then I took the vent glass out, put the door glass in and tried to install the vent glass and runner. Couldn't get it by the door glass. No go....
So I'm looking on-line, searching forums, studing the manual and generally being pissed off when the LOVELY - and incredibly SMART - Mrs E-tek walks in. I tell her of all my trials and she says: "I'll bet you have to pull it all half way out, put the door glass between the two runners and slide it all in together." "Right honey", I say. Women..... ;)
So while I go back to the manual, she asks if I want a Pumpkin Spice Blizzard (DQ does it right) and is off on her cloud of loveliness....
Now - back to the probelm at hand:
After a few more tries, I decided to pull the vent glass assembly part way out, then slide the door glass between both runners, then squeeze it all together, slide it all into the door and attach the door glass to it's lower channel and the vent runner on the bottom and it's small screws on top. The glass was now captured between the two felt runner bars and I was able to slide it up and down.
Bingo!!! SUCCESS!!!! Up, down, up, down, up, down. I could have done that all afternoon - thinking of Mrs E-tek of course!!! Damn woman - brilliant. Not sure if I'll tell her though because she's been right on a few things lately and I'm trying to preserve what's left of my manly dignity.
After about 10 (maybe 15) minutes of enjoying the now perfectly working door and vent glass assemblies, in walks Mrs E-tek with my Blizzard. Yummy. She asks how I got it together. Hmmmmm - how could I not tell her how much she just helped me? I did of course and she felt nearly as good as I did!
Here she is - new seals, painted and working smoothly!


 Several products roducts I've been testing this year are from Eastwood. They have a Rust Encapsulator, which is applied to rust and "fixes" it, or makes it inert. Once dry, you can apply various topcoats, like a primer, or their Chassis Black paint, or - as below - a sprayable undercoat.