Polished and riveted the data plates back to the driver door jamb...
Cleaned upand detailed the instrument panel. The plastic cover had a lot of scratches as well as some sealer or glue where someone tried to seal it to the bezel....
After a couple hours of air dusting, brushing, polishing & detail painting.....
October 17, 2011
October 15, 2011
The Chrome was all delivered this week and boy was it ever nice to see! Although one can see some tiny imperfections in some pieces, I've been through this before (with this company) and they may not come out any better if you send them for redo. I do know though that if I where going to do a concours job, or a 1936 Mercedes Coupe, I'd send the stuff to one of the high-end chrome shops in the states.
Also did some more detailing of parts, including putting some texturized coating (aka Rocker guard, or sprayable undercoating) on a few pieces:
October 14, 2011
Eastwood's Rust Products
One of the biggest parts of any restoration is the repairing - and abatement - of metal cancer: RUST. It never sleeps, so you have to either remove it, or kill it. Sandblasting or cutting is the only way to remove it, both of which aren't always feasable - or necessary.
The other way of dealing with rust is to arrest it by either chemically converting it to Iron Oxite from Iron Oxide, or by permanently sealing it from Oxygen and moisture. As one would imagine, there are LOT of products out there claiming they stop rust and it's difficult for the layman to know which products work and in which circumstance. That's where I come in.
Several products roducts I've been testing this year are from Eastwood. They have a Rust Encapsulator, which is applied to rust and "fixes" it, or makes it inert. Once dry, you can apply various topcoats, like a primer, or their Chassis Black paint, or - as below - a sprayable undercoat.
These are splash sheilds from the 56 Chev Apache product we're currenlty working on. They had a sprayed undercoating on them from the factory (or dealer), so I wanted to replicate that, but needed to make sure the rust wouldn't keep cooking underneath.
I like to pour it direclty on the item to be coated, then wipe off the excess (you can't return any to the bottle). Once it's been on for 30 minutes or more it turns black, which means it's working. The product will dry to a hard shell, at which time it's ready to prime or Top Coat.
The other way of dealing with rust is to arrest it by either chemically converting it to Iron Oxite from Iron Oxide, or by permanently sealing it from Oxygen and moisture. As one would imagine, there are LOT of products out there claiming they stop rust and it's difficult for the layman to know which products work and in which circumstance. That's where I come in.
Several products roducts I've been testing this year are from Eastwood. They have a Rust Encapsulator, which is applied to rust and "fixes" it, or makes it inert. Once dry, you can apply various topcoats, like a primer, or their Chassis Black paint, or - as below - a sprayable undercoat.These are splash sheilds from the 56 Chev Apache product we're currenlty working on. They had a sprayed undercoating on them from the factory (or dealer), so I wanted to replicate that, but needed to make sure the rust wouldn't keep cooking underneath.
As I mentioned, I elected to use a sprayable undercoating on these pieces. For this I used a product from Safety Clean, but many manufacturers have something similar.
More to come!
Door Glass Assembly and Mrs E-tek was right.....again.
Holy Cr^P. Ever have one of those super-frustrating days where a seeminly simple task takes HOURS longer than it should and you can't find what you need, try it 5 different ways and even cut your head open....and then the WIFE comes in and figures it out in 5 seconds....No? Oh. Well never mind then.
Today I installed the window runner felt kit, the vent window and runner and the door glass assembly's into the drivers door. After what was a 6+ hour ordeal, the riight door likely won't take more than an hour!
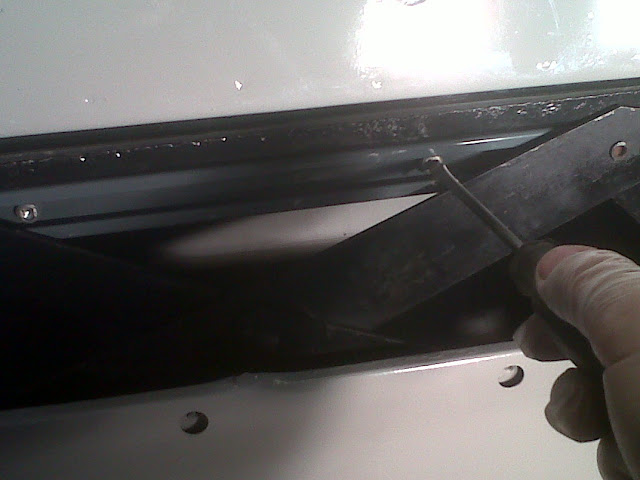
First off, install the window side felts, AKA Cat Wiskers, which snap in on either side of the window opening slot. You may have to use a screwdriver to squeeze one end of the clip to get it started in the hole, then push really hard to snap it in. You can't do these later, as the window will be in the way (same on most cars).
Next, I attached a pair of Vice Grips onto the regulator spline in order to be able to move the regulator arms when installing the door glass:
Next comes the large window runner felt on the door side. This item is slid down into the door and seated in a clip near the bottom of the runner, then carefully measure to where the vent window frame meets it and then cut to length with tin snips:
Poor photo, but this is looking down into the door. The new felt is slid into the clip at the bottom of the runner:
Now with most cars - and all others I've done - you slide the window down into the door and either tip it sideways to engage the rollers, or attach felted bolts through the window into the regulator arms......not so with the General. Not so at all.
After 2 or 3 hours of trying the above, scratching the shit out of the freshly painted window frame in the process, I took a break to re-paint the frame. While waiting for it to dry, I decided to try the other door, this time with the vent glass in. No go. Then I decided to remove the runner from the window and attach it first, then send the glass down and attach it. While that worked to get the channel on reg arm wheels, I still couldn't get the glass in with the vent runner attached in. Then I took the vent glass out, put the door glass in and tried to install the vent glass and runner. Couldn't get it by the door glass. No go....
So I'm looking on-line, searching forums, studing the manual and generally being pissed off when the LOVELY - and incredibly SMART - Mrs E-tek walks in. I tell her of all my trials and she says: "I'll bet you have to pull it all half way out, put the door glass between the two runners and slide it all in together." "Right honey", I say. Women..... ;)
So while I go back to the manual, she asks if I want a Pumpkin Spice Blizzard (DQ does it right) and is off on her cloud of loveliness....
Now - back to the probelm at hand:
After a few more tries, I decided to pull the vent glass assembly part way out, then slide the door glass between both runners, then squeeze it all together, slide it all into the door and attach the door glass to it's lower channel and the vent runner on the bottom and it's small screws on top. The glass was now captured between the two felt runner bars and I was able to slide it up and down.
Bingo!!! SUCCESS!!!! Up, down, up, down, up, down. I could have done that all afternoon - thinking of Mrs E-tek of course!!! Damn woman - brilliant. Not sure if I'll tell her though because she's been right on a few things lately and I'm trying to preserve what's left of my manly dignity.
After about 10 (maybe 15) minutes of enjoying the now perfectly working door and vent glass assemblies, in walks Mrs E-tek with my Blizzard. Yummy. She asks how I got it together. Hmmmmm - how could I not tell her how much she just helped me? I did of course and she felt nearly as good as I did!
Today I installed the window runner felt kit, the vent window and runner and the door glass assembly's into the drivers door. After what was a 6+ hour ordeal, the riight door likely won't take more than an hour!
First off, install the window side felts, AKA Cat Wiskers, which snap in on either side of the window opening slot. You may have to use a screwdriver to squeeze one end of the clip to get it started in the hole, then push really hard to snap it in. You can't do these later, as the window will be in the way (same on most cars).
Next, I attached a pair of Vice Grips onto the regulator spline in order to be able to move the regulator arms when installing the door glass:
Next comes the large window runner felt on the door side. This item is slid down into the door and seated in a clip near the bottom of the runner, then carefully measure to where the vent window frame meets it and then cut to length with tin snips:
Now with most cars - and all others I've done - you slide the window down into the door and either tip it sideways to engage the rollers, or attach felted bolts through the window into the regulator arms......not so with the General. Not so at all.
After 2 or 3 hours of trying the above, scratching the shit out of the freshly painted window frame in the process, I took a break to re-paint the frame. While waiting for it to dry, I decided to try the other door, this time with the vent glass in. No go. Then I decided to remove the runner from the window and attach it first, then send the glass down and attach it. While that worked to get the channel on reg arm wheels, I still couldn't get the glass in with the vent runner attached in. Then I took the vent glass out, put the door glass in and tried to install the vent glass and runner. Couldn't get it by the door glass. No go....
So I'm looking on-line, searching forums, studing the manual and generally being pissed off when the LOVELY - and incredibly SMART - Mrs E-tek walks in. I tell her of all my trials and she says: "I'll bet you have to pull it all half way out, put the door glass between the two runners and slide it all in together." "Right honey", I say. Women..... ;)
So while I go back to the manual, she asks if I want a Pumpkin Spice Blizzard (DQ does it right) and is off on her cloud of loveliness....
Now - back to the probelm at hand:
After a few more tries, I decided to pull the vent glass assembly part way out, then slide the door glass between both runners, then squeeze it all together, slide it all into the door and attach the door glass to it's lower channel and the vent runner on the bottom and it's small screws on top. The glass was now captured between the two felt runner bars and I was able to slide it up and down.
Bingo!!! SUCCESS!!!! Up, down, up, down, up, down. I could have done that all afternoon - thinking of Mrs E-tek of course!!! Damn woman - brilliant. Not sure if I'll tell her though because she's been right on a few things lately and I'm trying to preserve what's left of my manly dignity.
After about 10 (maybe 15) minutes of enjoying the now perfectly working door and vent glass assemblies, in walks Mrs E-tek with my Blizzard. Yummy. She asks how I got it together. Hmmmmm - how could I not tell her how much she just helped me? I did of course and she felt nearly as good as I did!
Here she is - new seals, painted and working smoothly!
Awesome Links for Hot Rod and Classic Cars
I'm always searchingfor more and better information on my love of all things vehicular....to that end, I'm going to keep a list of great sites I've come across. Check them out!
Hot Rod Garage - A collection of useful articles
www.hotrod.com
www.carcraft.com
www.powerblockmagazine.com
http://www.secondchancegarage.com
http://www.stovebolt.com
Hot Rod Garage - A collection of useful articles
www.hotrod.com
www.carcraft.com
www.powerblockmagazine.com
http://www.secondchancegarage.com
http://www.stovebolt.com
October 13, 2011
Doors coming together vent glass re-assembly
Today I spent a ton of time finagling the door parts together. Some of the most tedious re-assembly: the vent glass and all it's seals, door glass and run channels, plus the regulator and latch mechanisms....
Both the door and vent glass come out of their frames with manual effort. The door glass surround has 4 cpa-in-screws that will be rusted in, so take some time to soak them - as well as the frame/glass coonection - in some release agent (I like PB Blaster, but also use my own mix of Acetone and ATF) and some heat. For items this small I've gone to a Butane Torch, which is easier to light, use and concentrate on small screws than the Oxy-Acetylene Torch. Once the screws are out, it's a matter of pulling, pushing and lightly hammering the frame away from the glass with a rubber mallet. Take your time, work around the glass and it'll come off.
For the vent glass, once you remove the springed bolt at the bottom, the vent glass can be pushed downward and the top pin will come out of it's hole. Take a photo or draw a picture to ensure you know how many and which washers go where on the bottom pin. There are 2 round washers, then one keyed and pointed washer (to limit vent glass travel) in the top section, then the flat-ended spring, a keyed round wahers, bolt and a crush washer to hold it all together. Removing the glass from it's frame it similar as was the door glass, but I ended up holding the vent glass in the vice, with a mechanix towel for protection.
Once the vent glass is out, you'll need to remove the vertical seal by drilling out the rivets that hold it in. Just make sure you use a drill size that just barely gets the rivet out without enlargening the hole! After cleaning and painting the frame, installation is straightforward, but you first need to source the right sized rivet. Some sources said to use a crush-type rivet, to ensure it doesn't interfere with the glass when closing the vent window, but I found the 1/8" x to fit perfectly. If you find it touches and you can't squeeze or tap it out of the way, then just drill it out and try another size.
There's also a rubber surround seal for the vent window opening. Start with one side in the channel, rub a little WD40 (or similar) on the other side and pushing it in with something blunt so as not to tear or puncture it. Wooden popsicle sticks work great! You'll likely need to push, pull and tweak it until it's fairly stright, then slowly close the vent window while keeping the rubber seal from being pushed out of it's channel. It may help to wait until the lube you used is dry. Once you get it closed and latched, and the seal is straight, leave it closed - it'll help form it in place while all the lube dries off.
When you're ready to re-install the vent and door glass - along with their respective channels - check out the blog entry for that operation - it'll save you MANY hours!!
Oh Yeah - Chrome was dropped off tonight - check back here tomorrow for a viewing!!
Labels: hobby, hot rods
1956 chev truck apache window door glass vent assembly rebuild
Two car-related vids I just have to share. Either - with practice - could save you in a pinch!
Pull-start jump-start:
Dead Car Battery? Get A Rope!
VW Belt Quick-change:
Pull-start jump-start:
Dead Car Battery? Get A Rope!
VW Belt Quick-change:
Labels: hobby, hot rods
crazy car video pull start quick belt change
October 12, 2011
1956 Chevrolet Apache/3100 truck restotation - for show!
This is a copy of the first post in my thread located on Garage Journal. The truck is nearing completion, which I'll document here as well. If you want to see the entire build, check it our here: 1956 Chevy Apache Restoration
A friend of mine came into this beautiful survivor originally purchased by his Uncle and now owned by his Dad. It sat in a farm field, in the most extreme weather conditions, for 27 years. Prior to that it was a working farm truck in addition to taking 10 yearly trips to the coast (1200+ miles each way!). Upon it's retirement from road duty, it pulled a plow through farms and gardens. Through it all, it barely rusted - and I mean BARELY. It also still boasts it's original paint, the original engine and drive train and even the original factory grease-pencil markings.
My friend and his BIL began the resto by disassembling, bagging and tagging everything. They had the engine professionally rebuilt and have it stored in plastic. They ordered all the parts they thought needed, including two sill/steps, to repair the only real rusted areas on the truck. After getting both sides cut out and one side welded in, they decided they just didn't have the time or expertise to get it finished.
That's where I come in. They brought it out to my place today and I'll get it finished for them. This is definitely "cherry" work for me - as most resto's I do begin with months, maybe years, of rust work! I wasn't even going to take on an outside project this year due to wanting to do a lot of work on my Galaxie and 240Z projects...but I think I can juggle them all.
This is also my first Chevy! Not that I dislike Chevy's per se, it's just that I've found other makes come my way. But enough typing. Here's the first set of pics, to be updated over this winter, as I get it back to shape it was in when it left the factory... I hope you enjoy the progress.


They did a good job on the step, but found out just how much work it takes.

Original sheet metal - no rust!


Old-time ballast!! No wonder I never worked on Chevy's!!
My friend and his BIL began the resto by disassembling, bagging and tagging everything. They had the engine professionally rebuilt and have it stored in plastic. They ordered all the parts they thought needed, including two sill/steps, to repair the only real rusted areas on the truck. After getting both sides cut out and one side welded in, they decided they just didn't have the time or expertise to get it finished.
That's where I come in. They brought it out to my place today and I'll get it finished for them. This is definitely "cherry" work for me - as most resto's I do begin with months, maybe years, of rust work! I wasn't even going to take on an outside project this year due to wanting to do a lot of work on my Galaxie and 240Z projects...but I think I can juggle them all.

This is also my first Chevy! Not that I dislike Chevy's per se, it's just that I've found other makes come my way. But enough typing. Here's the first set of pics, to be updated over this winter, as I get it back to shape it was in when it left the factory... I hope you enjoy the progress.
They did a good job on the step, but found out just how much work it takes.
Original sheet metal - no rust!
Old-time ballast!! No wonder I never worked on Chevy's!!
__________________
Thanks for reading - please post your comments and link me to your site!
Labels: hobby, hot rods
1956 Chevrolet Apache/3100 truck restotation
Buy (North) American - save our economies!
Some of you may have caught the bit on the news lately of the reporter who spoke to economists and found that if home builders used just 5% more "Made in the US" materials, that the economy would grow by 250,000 jobs. He put together a list of US tool, equipment and material makers and faxed it to builders across the country. It's EXACLTY what we need and I think it could - and should - spread to every other industry. Certainly we - as tool, equipment, parts and building material purchasers can do our part.
(Of course the key is that it's completely VOLUNTARY - so I don't really want to hear about how you don't believe in propping businesses up, market pressures dictating survival, price bitching or the like.
)
Check it out here:
http://www.google.ca/url?sa=t&source..._Efv0AlE5yb8CQ
http://www.americansworking.com/buildingmaterial.html
Thanks for reading - please post your comments and link me to your site!

(Of course the key is that it's completely VOLUNTARY - so I don't really want to hear about how you don't believe in propping businesses up, market pressures dictating survival, price bitching or the like.
)Check it out here:
http://www.google.ca/url?sa=t&source..._Efv0AlE5yb8CQ
http://www.americansworking.com/buildingmaterial.html
October 11, 2011
Hidden Treasures of the Past
Last week, just outside Saskatoon, I had the opportunity to visit a secluded farm yard that serves as a graveyard for some cool old race and derby cars from many years past. My tour guide, Trent Lalonde, grew up knowing the gentleman who owns the farm, who - like so many farmers - had ventures on the side to help make ends meet. In this case, the farmer drove tow truck and was one of the dedicated haulers for saskatoon's early stock car association, moving incapacitated 'stock' cars as well as spent derby cars off the fair grounds.
In the field lay many examples of 50's and 60's vehicles, cut up to save weight, with crude roll bars welded together with globs of metal rod. In several cars one can see early fuel-cell design as well as true "bucket" seats that look about as comfortable - and as safe - as taping your kitchen chair to a speeding wreck!
As is often the case, the cars have been sitting so long that there is really nothing left to salvage, but through the hand-painted sponsors signage and drivers' names, one can still hear a call out from a time long past.
See the rest of the photo's, as well as the original thread on Garage Journal (www.garagejournal.com) here: Vintage Race & Derby Cars in the bush
Labels: hobby, hot rods
hidden treasures old race derby cars
Location:Saskatoon, SK, Canada
Saskatoon, Canada
November 15, 2009
E-tek's Super-weekend at the Reynolds-Alberta Museum
Leaving the boys with their grand-parents, we took off for the short trip to Edmonton, which is about 6 hours West of our home in Saskatoon. First stop (of course) was the Reynolds-Alberta Museum, one of the must-see automotive landmarks in Canada.
Once in Edmonton, we argued with the GPS (mistake) and took what looked like a more direct route to The Reynold's-Alberta Museum. Upon arriving, we realized that the GPS generally knows best - lesson one.
The RA, while described as a transportation-themed museum, has a real concentration on cars and boasts a fully equipped and functioning restoration/bodyshop facility where they restore the vehicles for display.
These museum-quality restorations are performed by a very experienced crew consisting of paid professionals and non-paid enthusiasts. They constantly have several restorations on the go, each in various stages of completion. From the upper gallery, or viewing area, I could see a wide variety of machines, from the brass-era, early model T's, 40'sand 50's classics and even more modern muscle cars. Unfortunatley, after my argument with the GPS, we came in close to closing, so I decided to leave the Missus in the general memorabilia section to see how much I could see of the resto-shop.
Sneeking past some barriers and through a partly opened door !), I managed to slip into the shop but was immediately found out by a senior employee (read:suit) After pleading my case and convincing the gentleman thta I was an enthusiast, not a criminal, he led me to a row of early Ford and Dodge engines and asked what I wanted to see the most! Well that was all I need and I begged for an opportunity to check out some of the equipment, the brass-era machine in progress and to speak to the painter, who I could see just exiting the paint booth, which was full of parts for one of the projects. Sensing my interest and sincerity, the gentlemen and I chatted for about 20 minutes and left me alone to peruse a fully equipped restorers dream shop.
I also found out about a couple of awesome programs they have. The first are restoration courses that run in sequence, beginning in February, from looking for and buying your first project, to introductions to many of the repair and restoration processes available. As well, in the summer, they have a classic-drive program where patrons can come out and get up close and personal (as well as drive!) various antique works of art!
So now I have another holiday week accounted for! Surely if you find yourself with holidays you can spend on your own, or if the better half wants to enjoy the many other parts of Edmonton while your at it, or even if you find yourself driving through Edmonton (who doesn't!), make sure to book some time at the Reynold's-Alberta Museum. It's growing all the time too - with plans to open a huge open-air history of flying section and more.
See it: http://history.alberta.ca/reynolds/
Labels: hobby, hot rods
reynolds alberta museum trip
Location:Saskatoon, SK, Canada
Edmonton, Alberta, Canada
Subscribe to:
Posts (Atom)