fb icon

fb icon
Follow E-tek on fb!

March 19, 2012

Aftermarket support

We get a lot of aftermarket support here at E-tek. This month there's been a veritable deluge of promotional material making it's way in to the shop. A couple of the cooler things where some huge SUMMIT Racing banners and this MOROSO/Competition Engineering banner:


Of course good PR is easy - build great products, send out some of that product andsome PR materials to the right places and get your company name in as many places as possible!


Don't forget to check out the website at www.E-tekRestorations.com !  

March 15, 2012

Sometimes customizing means doing it twice - or more


I didn't really love the way the exhaust system ended upon the Galaxie, so today I cut it apart and tweaked the rear half again to get the muffler closer to the floor and extend the pipes right out to the bumper.


After all that cutting, grinding and welding, I turned my attention to my pre 47 Flathead block. i have been searching for one for a few ears now after the original block powering my 46 Mercury truck developed a massive crack. Here's the link to that tear-down on GJ.com and here's the link to a thread I put up on FTE - Ford Truck Enthusiasts.

Early Flatheads have part of the bell housing cast into the block, so it doesn't really fit on a standard engine stand. Below is a method of attaching a FH blcok from the exhaust manifold bolt holes:

As is fairly obvious, this engine stand was made completely from scrap. The base was made from the parts that held my BendPak lift together during shipping and the engine cradle bits where just procured this week from my local steel recycler. The entire cost? About $35 including the casters.


I've actually been through several blocks to find one that MIGHT be salvageable. A lot of the blocks you find now-a-days have either been tossed for a good reason, or have been sitting in out in the elements exposed to water for years. This one has some light rust in one cylinder, but I'm hoping that can be repaired during boring. When I take it in for a hot tanking, I'll have them magnuflux and sonar the block to look for cracks and casting irregularities.


Lastly for today, lets talk tools.
Today I finally replaced my drill bit set.  I had long been relying on High Speed Steel (HSS) sets and sharpening them - either by hand on the grinder which is a difficult skill to master, or with a specific sharpening tool like the Drill Doctor. However this time I promised myself I'd by some quality bits so when I saw this Titanium Coated set from Canadian Tire, on sale for $40, I jumped!


Regardless of what you buy - quality or not - using tools other than for what they where intended will often lead to failure. Case in point was me using the hammer below to pry a rubber bushing from one of the lower control arms.....D'oh!


Don't forget to check out the website at www.E-tekRestorations.com ! Special thanks to www.Eastwood.com and www.CarCraft.com !

March 13, 2012

E-tek visits Graveyard Customs


Dropped by Graveyard Customs in nearby Warman, SK today to take a look at some of their awesome custom work. Owner Andrew Faris is an artist in the real sense of the word. He scratch-builds vehicles that look like no other, save for having 4 wheels and an engine. Looking at his work was both motivating and exciting for a gear-head metalworker like myself. Thanks for the visit Andrew!


Check them out here:  Graveyard Customs

Don't forget to check out the website at
for How-To, What with and Who's Who! 

March 9, 2012

Air Fuel Meter Installation

I've decided to move my ability to tune into the 21st century by installing an Air/Fuel Meter, first in the Galaxie, then into every carbed car I own. From the beginning of time, anyone who's ever tried to tune a carb has generally done so blindly. The only somewhat reliable method to getting a carb set-up properly was with an exhaust gas analyzer (EGA). I bought and restored an old Sun tune-up machine, with EGA, but even to, it measured latent hydrocarbon production, not Air/fuel ratio. By measuring AFR, you can dial in the mixture at different RPM ranges for the optimal settings for various loads. Sure beats the millions of attempts made by guys with a screwdriver looking like they knew what they where doing when twisting mixture screws in the driveway!

In order to use the same meter in several cars, all one has to do is weld a bung into each exhaust down pipe and then plug it when not in use. I think it'll be a worthwhile exercise, especially since - once the bung is installed - it'll only take about 20 minutes to move the meter from car to car.

Here is the lower portion of the install - I'll wire up the top side tomorrow, then we'll see how close I was with the old screwdriver-tune method of yore.

After a bunch of research I bought this AEM unit from my local Speed Shop.

The AEM gauge has a bunch of different back-lights available and a couple face plates.


Here's the bung welded into the pipe and the sending unit screwed into it. I know, I know - that's FAR from a pretty weld! I'm a little embarrased to show it, but it wasn't the easiest spot to weld. That's my excuse and I'm sticking to it!
The wiring from the sensor will run up and through the firewall to the gauge, then from the gauge there's another set of wires that go to the battery and ignition power. I've been thinking of installing it in such a way that it could be easily removed and sawpped into another vehicle. I'm just not sure if swapping it around from car tocar is worth the cost of the unit ($250).....although me thinks it would be. An A/F gauge is mostly used for tuning, so it doesn't really need to reside in the car all the time....


Don't forget to check out the website at  www.E-tekRestorations.com! Special thanks to
www.Eastwood.com  and www.CarCraft.com !

March 8, 2012

OK - finally back to the fun - working hard to get the Galaxie done. Sometimes I'm surprised at how much I decided to do on it this year....

New Addcco (from PST) 1 1/8th sway bar on front was installed - what a difference in size. Should make a major difference in the slalom - or at least freak out some tuners on the street! Rear bar is still en route after they sent an incorrect one....


KYB Gas Shocks replaced very old - if not original - units. This will add yet another level of control in the corners. Ever seen an 18 foot long land yacht carve corners? Stay tuned!

Spent about 5 hours today mocking up, fitting and welding the front sections of the dual exhaust pipes. Here I'm shaping the smaller primaries to blend into the new 2.5" pipes. A full set of headers will be installed on the 4 bbl 390 I'm rebuilding but until then, I'll be running the stock manifolds.


I tried to tuck them up as close to the trans cross-member as possible.

Dual exhaust was a LONG time coming for the Old Gal! I can only imagine what uncorking this restriction will do to our power levels! Next week we'll see for sure with some "seat of the pants" dyno numbers.

Still a few things to do before calling her done though.....
 Front shocks....

New brake shoes, E-cables and brake hardware all around.
Aswell, new speakers for our tunes - finally, no more AM Talk Radio while cruising!

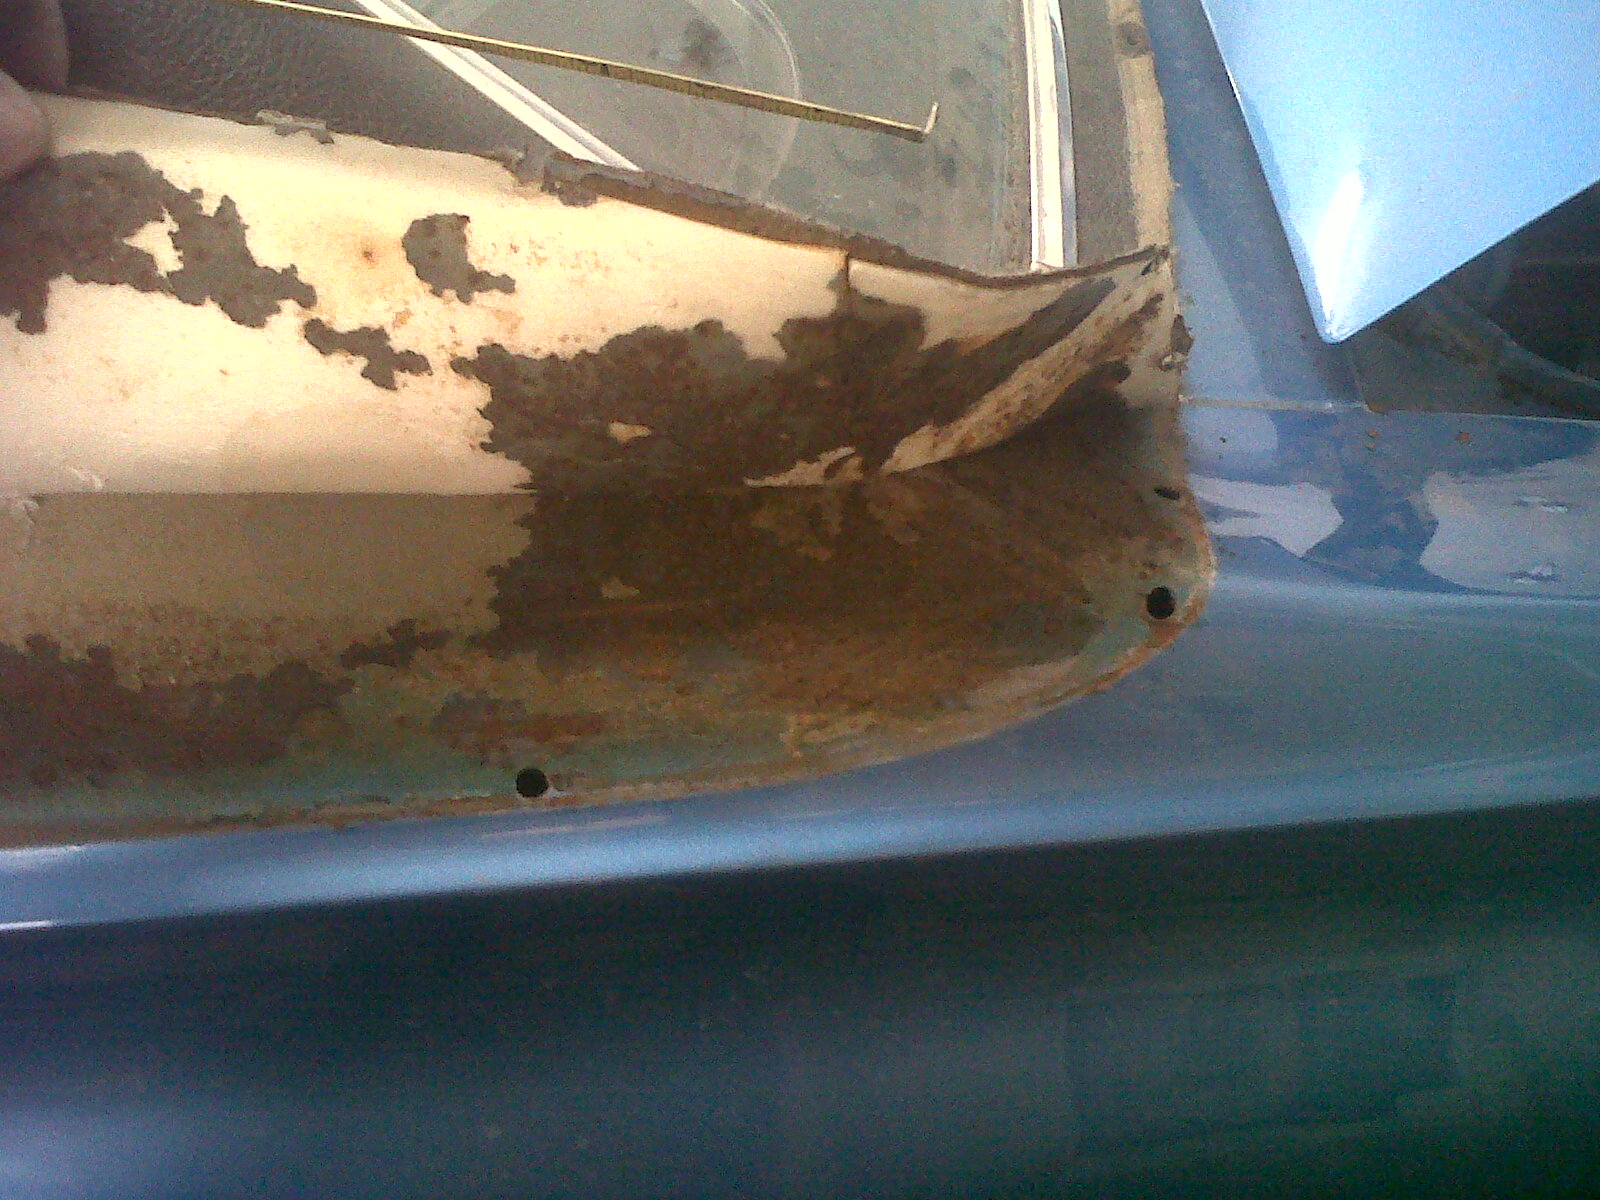
As I said, I'm trying to tie-up the Galaxie while awaiting metal parts for this 1967 CougarI'm restoring for a freind. This week the front and rear glass came out and while the front area was perfect, the rear showed typical rust damage in the bottom corners and, while not nasty, there was enough rust damage to warrant some metal replacement.


Even though the owner stripped 90% of the parts, the truck will still fill up with other stuff!

March 2, 2012

Exhausting work!

The next E-tek project is this sweet '67 Cougar XR7, owned by Trent Lalonde, who spear-headed the resto of the '56 Chevrolet 3100 Truck I completed last month. This one will look cool done to those standards - but even though he wants it show-ready and real purdy, he told me he wants to drive it regularly and has even thought it all out - right down to shoulder belts for the back seat to keep his two beautiful daughters safe during summer cruises! How can you not like a guy like that?


At first glance, the car looks solid and fairly clean, save for the wear of many years and 3 paint jobs.    Looking a little more closely, we start to get clues as to where some more time will need to be spent and also where some more investigation will be required. Under the vinyl top on the left side is some fairly heavy surface rust. This makes me thing there will be some perforation in the corner where the glass sits - very common.   So, very first thing I did is call my glass guy, Chase from Showtime Glass. He'll come out tomorrow and remove the delicate original glass mouldings - front and rear - as well as the glass itself. If there's one thing I've found over the years, sis that ome things are best left to the sub-specialists!

This side looks a bit worse in that the rust is spread out more, but it's not as flakey, so hopefully there isn't perforation. Regardless, it'll get sandblasted clean and if it can't withstand that, it'll get new metal.


Looking closely up front, we can see it had been hit at some point, hard enough to damage the front of the inner fender. This means that this panel, and therefore this side and corner, are "shorter" than the other, non-damaged side. Critical here will be to get some measurements of the front end in an X-pattern to see if the front-end is square. It should be close, as the gaps all look decent, but there's lots of ways to hide stuff like this and even-out gaps, even though the substructure may not be square. Along with another clue - that of the hood hinges being welded to the inner fender apron, means a lot of study and likely some work will be required to get everything lined up - BEFORE bolting or welding anything to the front end.

Here's a 'sweet' (I mean disgusting!) old-school access port. Trent tells me it was common on these Cougars for mechanics to cut a hole in the shock tower to access the upper ball-joints grease nipples. I guess we can say that at least someone greased the nips - but hell, they could have at least used a holesaw and then fitted a rubber button in it afterwards. Of course Ford could have thought of that too...which always leads me to think: am I REALLY the first person to think of that?? Unlikely.

The owner tore most of it down inside and out, leaving me just the front suspension and some minor trim pieces to remove before tearing into it. With everything out, we can see some of the work that lies ahead.

See below.....


Looking inside, the floor pan is generally good, except for the passenger front section, where it's rusted through - swiss cheese style. So the decision has to be made - make a patch for this area, or order an pan just to use this area? Lucky for all, nowaday these sheet metal parts are made in good quanity AND of good quality, so that we can buy larger sections and not break the bank. That way you get exactly the cut you want, with all the right markings and ridges.
On the driver side, the floor pan is solid, but the firewall is toast. This is one of those situations where you now have to buy two large sections of metal to get the sections you need. The trick - or art if you will -  is finding some lines that would best hide the cuts and welded seams......

But for now we'll leave the Cougar until the glass is out. I can remove some trim and stuff too, but I want to get the Galaxie done so I can swap it off the lift.


And now..... back to the Galaxie.....

Last week was like Christmas at E-tek. My big order from SUMMIT RACING was delivered by FedEx. Included was a huge box of exhuast parts and another box with shocks, bushings and other key bits and pieces that will help turn the tired old Gal into a fresh hottie that goes as well as she looks.

So today I continued the exhaust mock-up and fitment and then got started on installing some of the suspension parts. First up was replacing the lower control arms that where removed to repair the frame and torque boxes. 
 When I removed the control arms, I had to cut the bolts out of the axle shackles. I looked high and low for new replacements but couldn't find any with the exact right shank diameter. Once again I went to my parts stash and found a pair of bolts the exact same size. Where they came from I can't recall, but once again it re-enforces the need to keep most everything like that!
The Rolling Jack on my BendPak lift came in handy in an unexpected way too. I slid it under the mufflers to  keep them at the right height while I set up the axle section of pipe.

Getting close here - a little more adjustment at the other end and it should come together nicely.


Here's the tab and hanger I made up for the up and over section. Once everything is as high and tight as possible, I tacked the tab sides to the pipe.
Here's the two sections welded together. The key is tucking them up nice and close - but not so close so as to cause excess heat on any key parts, as well as the cooking of any feet in the passenger foot wells.


Below is the finished product - from the trans cross-member back anyways. Now I just need to make up the front sections to tie into the stock manny's, which will include stepping the 2.5" pipe to a short section of 2", then to 1.75" to bolt into the stock openings. This will hopefully be temporary, until I get my other 390-4V rebuilt with the Flowtech headers I also bought from SUMMIT, at which time they should fit right up to these 2.5" pipes. More work, but sometimes necessary when customizing parts.


I know they look a little crooked here - the mufflers aren't welded to the pipes yet, so I've got time to make sure they are straight and even, plus tucked up close to the driveshaft. Best to leave these until the very end - just in case you need to twist the front section to fit!

March 1, 2012

Bushings and exhaust hangers - behind the scenes....

There's a lot of stuff that goes on with restorations and repairs that not very exciting - even for a car guy. The installation of bushings and making exhaust hangars are two of those tasks - but the real "sexy" stuff ;) can't happen without these support bits. Like any great play - it's only as good as it's supporting players..... (who said car guys can't be cultured?).

After much work resulting in my ruining one bushing, I took everything to the local Minute Muffler Shop. I needed extra tubing for the exhaust system anyway and had purchased pipe from them before, so I thought I'd see if they had an industrial press - which they did. I left all the pieces in their much more capable hands and will pick them up later. Oh well, I'm smarter now and only out a few bucks!


Here's all the bits and pieces that came with the exhaust setup from SUMMIT Racing. I know, exhaust clamps suck and shouldn't be used in a nice fab-job, but they are good for mock up. Once I get it all fitted, I'll weld up some tabs as well as the joints.


The Galaxie had one main hangar that I could re-use for the axle loop, but I needed another, so I fabbed up a similar set up. Using a piece of a tire that had given up pieces for the Challengers exhaust, I cut a piece the same size as the original and also cut and bent some metal pieces for the rest of the hangar.


Close enough.


This is how the exhaust was cobbled together previously. It's not that it didn't work, it did - for many years - but I'm excited to see and hear the car with the new full-dual 2 1/2"  set-up with the Dynomax free flow mufflers. It's a similar system I had on the Challenger and it was great.


As I mentioned, I did a lot of "background" work today - and didn't take a lot of photo's. Tomorrow I'll shoot the fruits of all that labour.


Don't forget to check out the website at www.E-tekRestorations.com ! Special thanks to www.Eastwood.com and www.CarCraft.com !

February 29, 2012

Back to the fun!!

Finally got some time to work on the Galaxie again and broke thorugh the worst part, that of rebuilding the torque boxes. This right rear wasthe last one to be done:


Once that was all done (phew!), I started the mock up of the exhaust. I still haven't decided whether to try and remove the stock exhaust manifolds, which makes a difference in both the manifold end and the overall length of pipe required.


The 2 1/2" pipe looks massive and is going to make a huge difference. I've been told it could make a 30-50HP difference....I doubt it'll be that much, but we'll see.


Next up is getting the real control/trailing arms back in. I tried everthing I could using my makeshift press but couldn't get the bushings to seat, so I'll take them to a shop tomorrow.  At the same time I'll buy some extra 2 1/2" tubing.


Don't forget to check out the website at www.E-tekRestorations.com ! Special thanks to www.Eastwood.com and www.CarCraft.com !