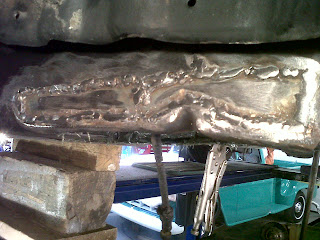
First up is fitting the pieces. Grinding edges, bending into shape and trimming holes for any pass-throughs.
After that, I marked the edges on the torque-box side and used a carbide bit and grinder to clean off the metal where the weld would hit.
Something I like to use when welding near anything that may get heat damaged is Benzomatic's COLD COAT. It's a gel that blocks heat and dampens it's damaging effects. Also, it confers an additional level of safet when things get hot!
Here I've coated a fuel-return line with the Cold Coat. It was far enough away so as not to be in direct contact with the weld, but better safe than sorry!
Before welding in the patches I measured the distances from the frame to the lift ramp on each side to be sure there was no twist in the frame. This left side was about 1/4" lower than the right side, likely due to the effect of driver weight over time. Regardless, I used a bottle jack to equalize both sides prior to welding so that when everything was welded solid there wouldn't be a discrepancy in frame height.
 In order to seal any gaps - and add even more structural integrity - I always cover my patches with "kitty hair", a fiberglass re-enforced filler. Although this area will be forever hidden once the bottom plate is welded on, one can forsee moisture from puddles getting in there, so it's critical not to leave any spaces or surfaces where water could penetrate and sit. Oncethe filler is dry I'll smooth it out and apply a black undercoating - prior to welding up the bottom plate.
The outer surfaces where also coated with Kitty hair. It dries to a solid, again, it's a structurally sound surface that can be smoothed out with a grinder or sander, whcih will be important here as all the outer surfaces will get dressed out until the repair is invisible.
 Tomorrow, the last piece to go on will be the bottom plate. This will enclose the torque-box and add much needed strength where the frame meets the front substructure. Almost done this side!
Don't forget to check out the website at www.E-tekRestorations.com !


